
In our life we accumulate a lot of weight on our shoulders. Meaning that every time we gather some emotional baggage, very often it will be put on top of our shoulders (this is metaphorical of course).
If you’d like to get a bit of release in your shoulders, then you’ll find 5 amazing asanas that will help you to gain some relieve.
These positions are part of my shoulder/heart openers video, so if you’d like to experience a full yoga practice, you can watch it down below!
These asanas will work as a counter effect on the slouch effect. Which is quite common as we are now sitting badly in front of computer, television, in meetings, and more.
I must add to it that while we’ll be working on our shoulders, you’ll also be working on your lower back. People with slipped disks and other back issues, please be careful and don’t overdo it!
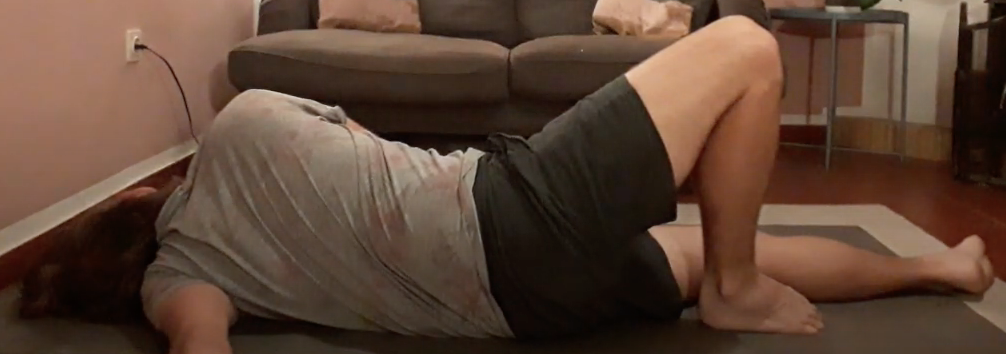
#1 Open Wings
This must be one of my ultimate favourite shoulder exercises. It has a great name, but be warned, this asana is quite the challenge.
And I’d also like to mention that it might not be the perfect position for you to try. If you have or had a shoulder injury in the past, be cautious while doing this asana.
In the video down below I’ll be giving some tips and tricks on how to go deeper or to back off a little.

Instructions:
- Lay down on your belly on the mat.
- Spread your arms, level them with your shoulders on your mat.
- After that, put one of your hands next to your body.
- Push yourself on your side.
- Move your weight on top of your shoulder.
- Stay here for 2-5 minutes.
Variations:
In this position there aren’t so many variations, but there are a couple of things you’ll be able to do to make it easier for you. Or a couple of things that make you go deeper. Let’s have a look.
- To go deeper, you can place your foot (left foot if you’ve placed your left hand on the mat) behind your lower leg.
- To take it easier, place your foot in front of your lower leg.
- Another way to make it easy on you, keep your hand on the mat and make sure that you get some weight on your hand and arm. This will distribute weight a bit better and it will make it easier on the lower shoulder.
Precautions:
As I mentioned before, make sure that you don’t have any shoulder injuries. And if you do, there are a couple of ways how to deal with it, which you’ll see right above here.
Another, not so common thing for this pose: wrist injuries. This is especially for when you are putting weight on your hand and wrist.
#2 Melting Heart
Another great name, isn’t it? This pose is a great one, for the shoulders of course. And as a backbend, it isn’t too intensive just yet. Intensity, of course, depends on yourself and how deep you’ll be going into this yoga pose.
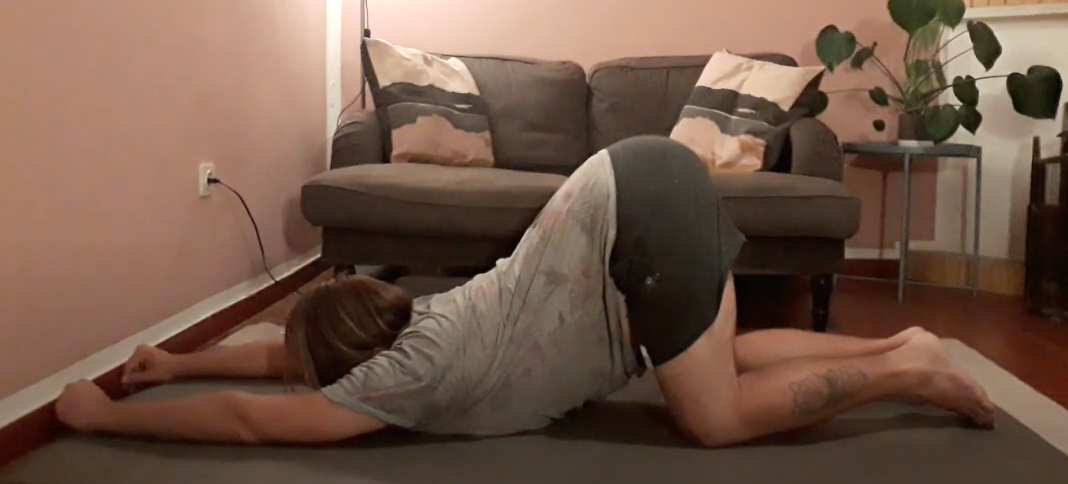
Instructions:
- Start in Tabletop position.
- without moving your lower body, walk your hands to the front of your mat.
- Extend further while you bring your chest towards the mat.
- Stay here for 3-5 minutes.
Variations:
- Do you wanna go deeper into this position? Well, then you can use two yoga blocks. Place these two blocks where your upper arms would normally be and then place these on the blocks. Bring your chest towards the mat again. Your hands can go in prayer mudra at the back of your head.
- You’d like to go a bit easier on yourself? Instead of bringing your chest all the way towards the mat, let it hover a little. Then you can bring your forehead to the mat instead of your chin.
Precautions:
This asana puts a big strain on the neck and lower back. Make sure that you use the variation that suits you best, or to skip this position overall.
Also, if you feel anything that isn’t normal in your body, please don’t go any further into this position. You can decide to take it a bit slower and back off a bit, or even to come out of this position and take some time in childs pose.
#3 Supported Fish Pose
If you’d like to be a bit more passive during your yoga, this position might be the one for you. It will be challenging, but you can let gravity just do its work. For this position, you’ll be needing a bolster! For those with respiratory issues, this position might do wonders for you too!
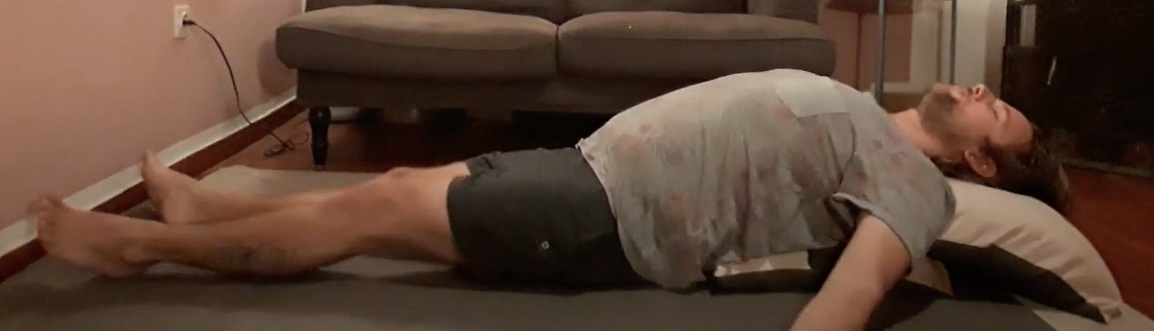
Instructions:
- Start in a seated position.
- Place a bolster or two pillows behind your back, in such a way that it’s aligned with your spine.
- Bring your upper body down on top of the bolster or pillows.
- Your legs stay extended.
- Your arms next to your body, relaxed.
- Stay here for 2-5 minutes.
Variations:
Within this position you can only go deeper. To do this you can put your bolster horizontally around the area where your upper back will go. The crown of your head will touch the mat and your throat will open as well.
Be cautious that this variation/option is not for just anyone. It puts quite some strain on the neck and it might cause injury in the cervical spine.
Precautions:
People with neck, lower back and shoulder injuries should refrain from this asana. Or at least make sure that you’re not going too deep into the position. As there are not so many options though, this might not be that easy.
People with migraine or chronic head aches also shouldn’t practice this asana.
#4 Sphinx Pose
Aaaah, the majestic Sphinx, probably one of my favourite asanas. This position is quite amazing as it is very light on the shoulders, but it still has a massive effect on you.
People with lower back problems might need to read this article first to see how to deal with the sphinx and your lower back!
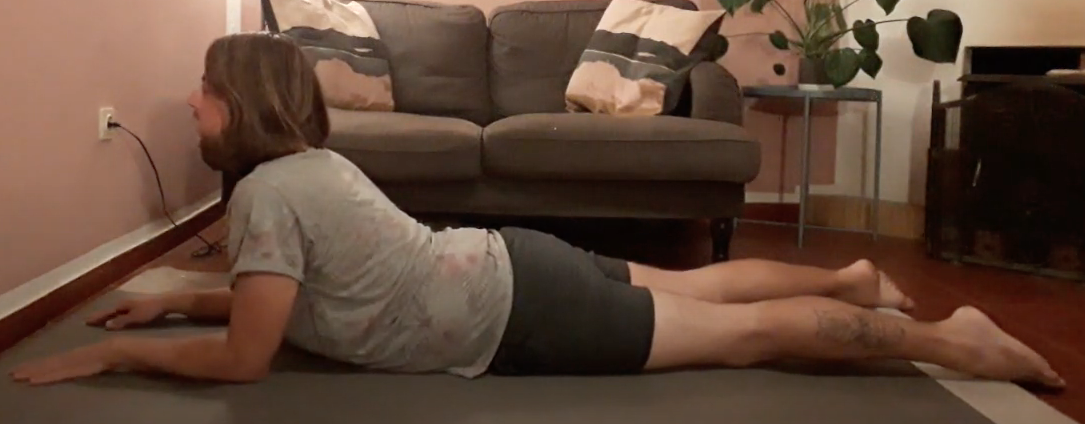
Instructions:
- Lie down with your bell on the mat.
- Place your underarms into the mat.
- Slowly push your upper body up.
- Arms come into a 90° angle.
- Stay here for 3-5 minutes.
Variations:
- If you’d like to go deeper, you can go into seal pose. To do this, you’ll have to put your hands into the mat and push your entire upper body up. There is no angle in your arms, just keep them straight.
- If you have an injury in your lower back, you can remove your arms further away from your upper body. This lowers the angle of your arms, but also of your lower back. Go lower until you reach the ideal position for you. Keep in mind that doing this will lose the effect of the shoulder stretch and will completely focus on your lower spine.
Precautions:
If you are injured in lower back, shoulders or neck, it would be good to take cautious with this position. Keep it mild and painless.
For women who are pregnant, you might need to go for the seal options. Unless you’ve developed some lower back issues during your pregnancy, then it’s best to avoid this asana in general.
Free Video: Shoulder Stretch Yin Yoga Practice
And now, if you have about 50 minutes, you can opt to do this free video. Take your mat and your blocks and get ready for some deep relaxation and stretching.
If you like the video, I always appreciate a comment or a thumbs up! And if you have any wishes or desires of yoga routines for the future, please let me know in the comment section down below!


This is a very interesting article to read Through, it is very true that we accumulate a lot of weight on our shoulders and it is a good if we can get them off by engaging in some activities like these 4vgeat Asanas that you’ve explained here, it is good that you shared how to do them. Thanks
Thank you Bryce! Have you also tried them as well by chance?